Accurate, synchronised time is a very useful thing for electronic devices to have. Nearly every modern electronic device that can connect to the internet will use NTP (Network Time Protocol) servers to synchronise their internal clocks; PCs, laptops, tablets, TVs, mobiles etc, will all use internet based NTP servers to adjust their clocks.
For the most part, this is fine - all of your devices will likely have the correct time to the nearest second. Network delays (ping) can add a small margin of error to time you recieve, but its unlikely to cause an issue in the home environment. However, if like me you have segregated your network and blocked internet access to any of your IOT devices, these will not be able to synchronise their clocks and may drift significantly over time - especially after power cuts if they don’t have battery on board to maintain a clock. My IP cameras clocks drifted by as much as 20 minutes, which is less than ideal and made it difficult to find time based events in the footage - it would also cause issues if the footage was ever needed as evidence as the timestamp would be completely wrong!
To fix this issue I’ve built a stratum-1 NTP time server on a Raspberry Pi using GPS as the preferred time source.
The accuracy of time servers
NTP servers are graded by their accurancy. A reference clock such as a cesium based atomic clock or GPS based hardware is referred to as a stratum-0 source, however these sources cannot be used on a network as the network itself introduces too much inaccuracy. A stratum-0 source is used as the direct input for a stratum-1 NTP server. The basic definition of a statum-1 time server is that it is directly connected to an accurate time source. A stratum-1 time server acts as a primary network time standard. From there a stratum-2 server is connected over a network to a stratum-1 server, a stratum-3 to a stratum-2 and so on.
As you progress through different strata there are network delays involved that reduce the accuracy of the NTP server in relation to UTC. Typically a startum-1 time server is accurate to less than 10 microseconds (or 0.00001 seconds), each additional strata will add anything from 0.5 - 100 milliseconds of network based time error (up to 0.1 seconds).
For more information on NTP strata read this wikipedia article on NTP Servers Clock Strata.
Required Parts to build a cheap stratum-1 NTP server
A Raspberry Pi - pretty much any Pi with an ethernet port will be fine, a Pi 4 model B would be the best as the ethernet controller is directly connected to the SoC via PCIE rather than via the shared USB bus as on the earlier models. Sharing this bus can cause inaccurate ethernet timings, but so long as the Pi is being used exclusively for the NTP server and has no USB devices connected, you should be fine. I’m using a raspberry Pi 3 B+. Cost: £34

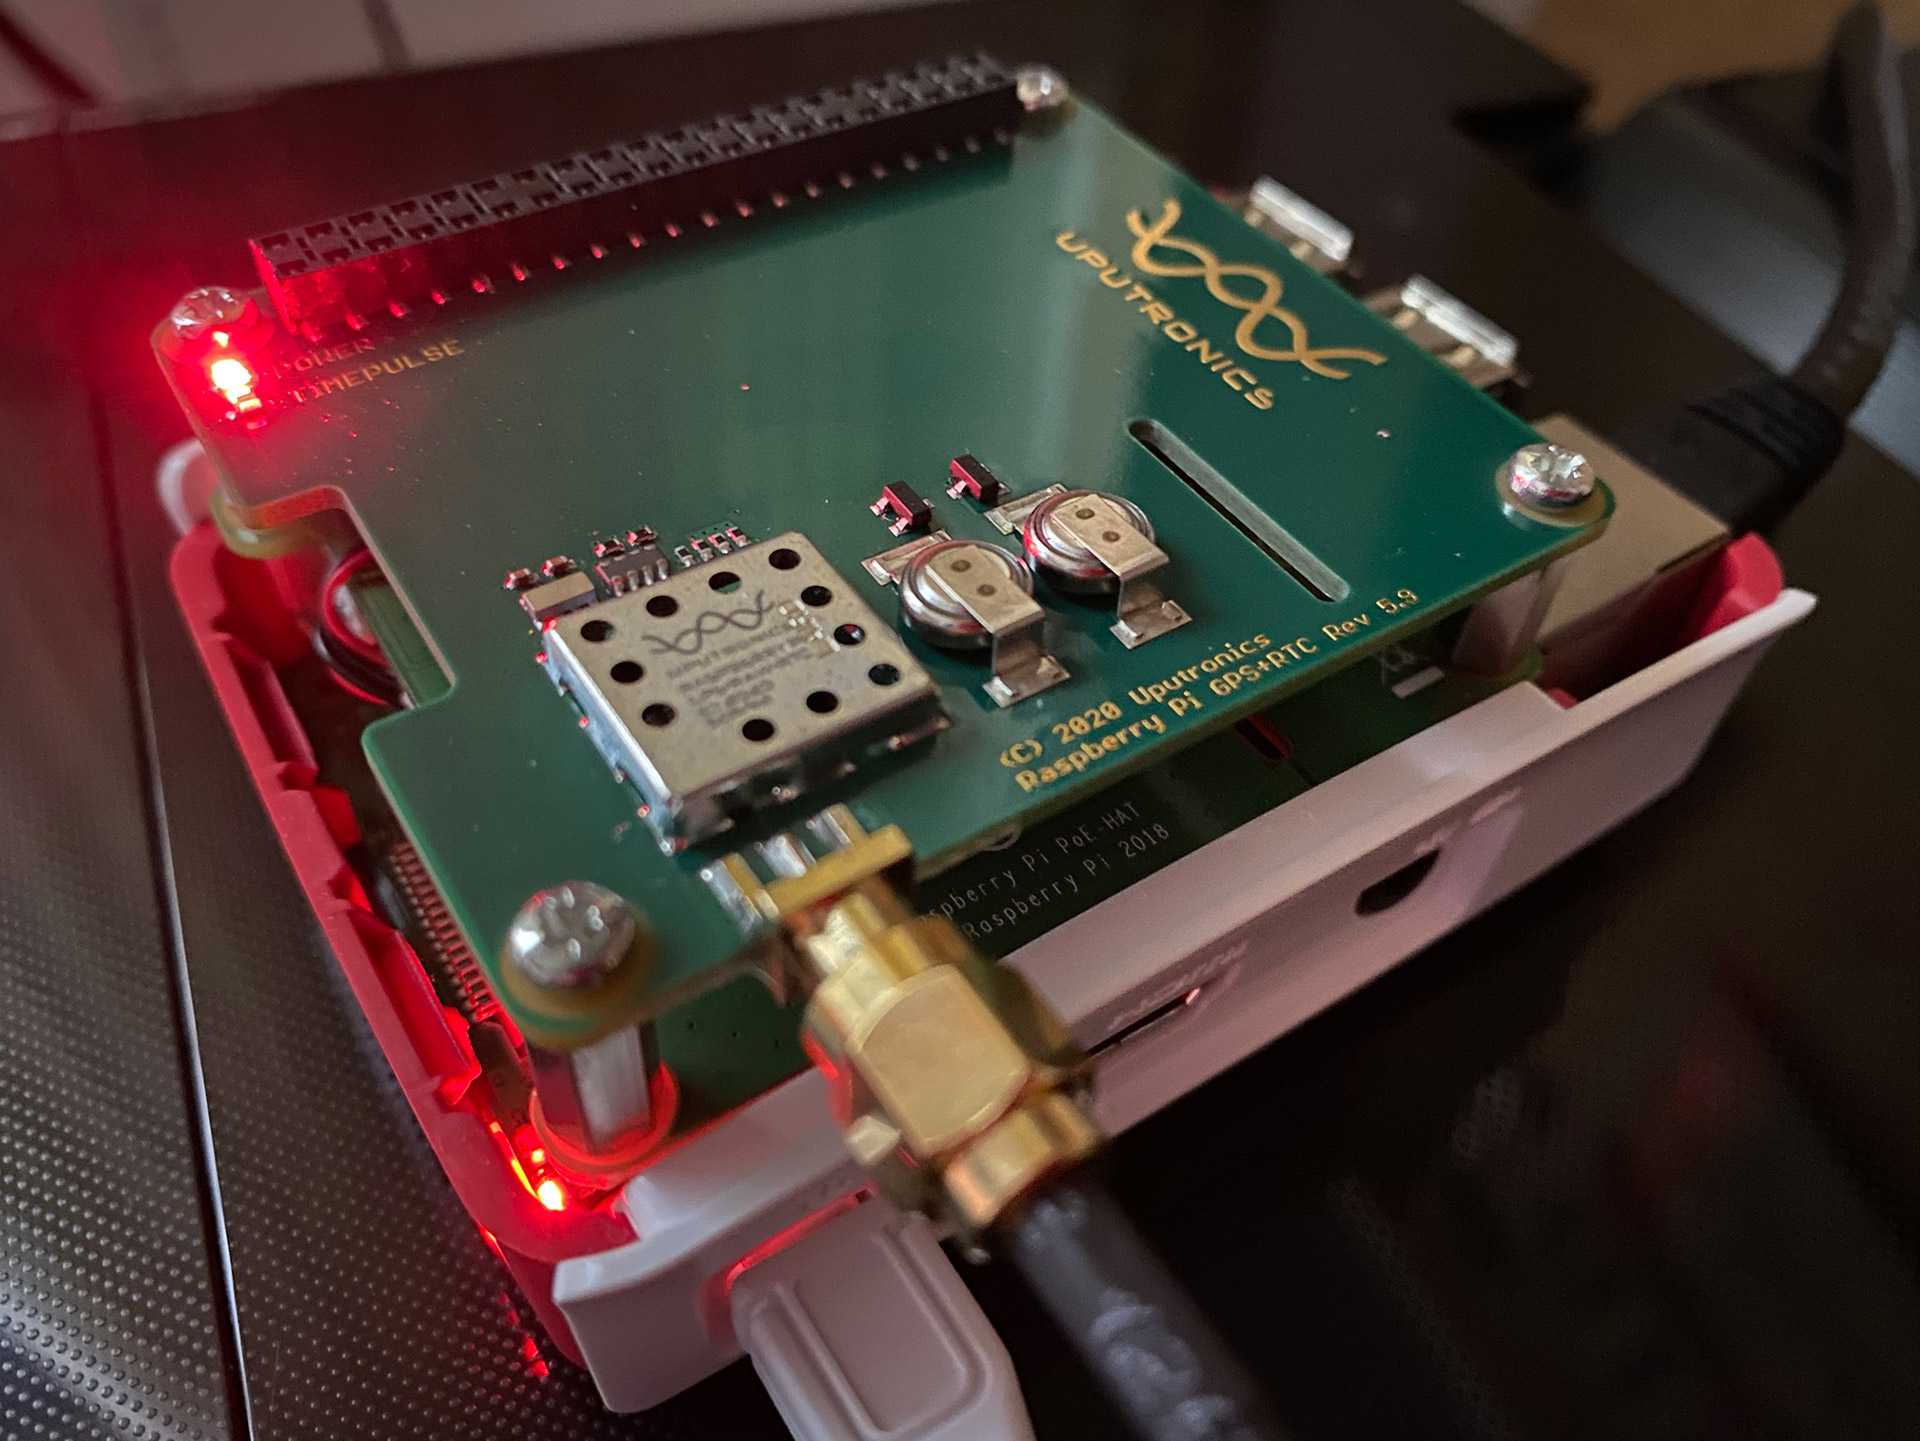
Raspberry Pi 3 model B+ A GPS hat with PPS (Pulse Per Second). We could have used a USB GPS reciever, but that would use the USB bus (see above about older Pis) and we would only have accuracy to nearest 500 ms due to how serial connections work - to get accuracy needed for a stratum-1 NTP server we need PPS where a extremely accurate timing pulse is sent at the start of each second - more on this later. I used a Uputronics Raspberry Pi GPS/RTC HAT. Cost £42

Uputronics Raspberry Pi GPS/RTC HAT External GPS Antenna. Some GPS HATs have antennas built in, but for me having an external antenna gives me flexibility to locate the pi and the antenna where it can see sattelites. I used an Adafruit External Active GPS Antenna with 28 dB gain and 5m Cable. Cost £15

Adafruit External Active GPS Antenna Power suppy, case, ethernet cable, SD Card. I won’t detail these here. I’m also using the Raspberry Pi POE hat to power the Pi and GPS HAT, but I still need to find a case to fit the double stacked Pi into! Estimated Cost £25


Total cost for Pi based stratum-1 NTP server £114. Typical cost for a commercial stratum-1 NTP server £500-£1000.
Building the NTP server.
Thank you to Johannes Weber, Steve Friedl and Nick Sayer for your guides - all of which were very useful to help me create my own Pi based NTP server.
This guide assumes you know how to install and setup a Raspberry Pi, if not I’ve made a handy Raspberry Pi Guide to get you started.
Step 1: Configuring the hardware serial port
Before we can setup the NTP server, we need to do a little bit of housekeeping on our Pi. First we need to disable the serial login shell while keeping the hardware port enabled:
sudo raspi-configThen navigate to 3 Interface Options > P6 Serial Port then choose the following options:
- Would you like a login shell to be accessible over serial? > No
- Would you like the serial port hardware to be enabled? > Yes
If you are using a Raspberry Pi 3 or newer with bluetooth, we will need to disable this as we want to use the hardware UART directly for the GPS reciever. This is done in a few steps.
Disable the console getty services
We want to disable the serial console as we want to use the UART directly for our GPS Hat
sudo systemctl stop [email protected]
sudo systemctl disable [email protected]
Disable Bluetooth and steal the hardware UART
As I am dedicating this Pi to be solely my NTP server, I have no use for the bluetooth so I am going to disable it completely. To do this we can use the Device Tree Overlay facility to easily tailor the low-level device behaviour.
Edit /boot/config.txt and add the following lines:
# Disable BT - Use the /dev/ttyAMA0 UART for GPS, not Bluetooth
dtoverlay=pi3-disable-bt
Those wishing to actually use Bluetooth with the software UART can do so, though with reduced efficiency, with:
# Use software UART for Bluetooth
enable_uart=1
dtoverlay=pi3-miniuart-bt
And though not strictly necessary, we can also disable the hciuart service that nominally attempts to talk to the UART; this may provent some warnings in the log files:
sudo systemctl disable hciuartWe will need to reboot to make these changes.
Step 2: Test that we have a working GPS signal over the serial port
Now is a good time to test that we have correctly configured the hardware UART to allow the GPS hat to communicate with our Pi. We can easily test this using the following command:
cat /dev/ttyAMA0You should see an output similar to this:
$GPGGA,052731.000,3343.3943,N,11749.3064,W,2,04,3.93,24.8,M,-34.2,M,0000,0000*65
$GPGSA,A,3,13,17,28,19,,,,,,,,,4.05,3.93,0.99*0C
$GPRMC,052731.000,A,3343.3943,N,11749.3064,W,0.84,313.46,240117,,,D*74
...
Step 3: Enable PPS (Pulse Per Second) support
We’ve got working GPS data, but in order to get the precision required for our stratum-1 NTP server we also need PPS. As the serial data include a whole bunch of information or noise that we don’t really care about, such as longitude, latitude, number of satellites, signal strength etc, we don’t always get the exact same data each second. The time sentence might not always be ‘on-time’ - it can be as much as 500ms late.
To solve this we can leverage PPS, which is a super precise pulse that indicates the start of each new second.
Enable PPS Support in the kernel
Linux has special kernal support for PPS input via a GPIO pin on our Raspberry Pi. To enable it we need to edit two of the config files.
Edit /boot/config.txt and add this line:
dtoverlay=pps-gpio,gpiopin=18NOTE: different GPS hats use different GPIO pins for PPS; check your documentation to see whether it’s using GPIO #4 or GPIO #18 and edit above as needed.
Edit /etc/modules and add this line:
pps-gpioReboot for these changes to take effect.
Install pps-tools
This is a standard package, but not installed by default. Install using:
sudo apt-get install pps-toolsWe can now test that we are getting PPS on the GPIO pin. (Note this won’t work if your GPS reciever doesn’t have a fix - the GPS hat I’m using has a timepulse LED that flashes on each second once it has a fix.
sudo ppstest /dev/pps0You should get an output similar to this with a new line added each second:
trying PPS source "/dev/pps0"
found PPS source "/dev/pps0"
ok, found 1 source(s), now start fetching data...
source 0 - assert 1604957588.999995987, sequence: 197333 - clear  0.000000000, sequence: 0
source 0 - assert 1604957590.000001416, sequence: 197334 - clear  0.000000000, sequence: 0
source 0 - assert 1604957591.000000698, sequence: 197335 - clear  0.000000000, sequence: 0
source 0 - assert 1604957591.999998783, sequence: 197336 - clear  0.000000000, sequence: 0
...
Step 4: Setting up the GPS Daemon
The latest version of GPSD worked just fine for me, so we can install this using:
sudo apt-get install gpsdBy default gpsd installs assuming you will be plugging in a USB GPS reciever, so we need to reconfigure it
Edit /etc/default/gpsd so it looks like this:
# Default settings for the gpsd init script and the hotplug wrapper.

# Start the gpsd daemon automatically at boot time
START_DAEMON="true"

# Use USB hotplugging to add new USB devices automatically to the daemon
USBAUTO="false"

# Devices gpsd should collect to at boot time.
# They need to be read/writeable, either by user gpsd or the group dialout.
DEVICES="/dev/ttyAMA0 /dev/pps0"

# Other options you want to pass to gpsd
GPSD_OPTIONS="-n"
Create the gpsd service
We need to make sure that gpsd runs on boot. We can create the following symlink to do this:
sudo ln -s /lib/systemd/system/gpsd.service /etc/systemd/system/multi-user.target.wants/Reboot your Pi.
We can now check that the daemon is running using the following command:
sudo service gpsd statusWhich should output something like this:
● gpsd.service - GPS (Global Positioning System) Daemon
   Loaded: loaded (/lib/systemd/system/gpsd.service; enabled; vendor preset: enabled)
   Active: active (running) since Sat 2020-11-07 14:44:07 GMT; 2 days ago
 Main PID: 346 (gpsd)
    Tasks: 3 (limit: 2182)
   CGroup: /system.slice/gpsd.service
           └─346 /usr/sbin/gpsd -n /dev/ttyAMA0 /dev/pps0

Nov 07 14:44:07 jeremy-clockson systemd[1]: Starting GPS (Global Positioning System) Daemon...
Nov 07 14:44:07 jeremy-clockson systemd[1]: Started GPS (Global Positioning System) Daemon.
We can now check that our GPS is getting a good fix using a tool such as gpsmon
This can be installed and then run with:
sudo apt-get install gpsd-clients
gpsmon
Which should output something like:
┌──────────────────────────────────────────────────────────────────────────────┐
│Time: 2020-11-10T20:54:35.000Z Lat:  XX XX' XX.XXXXX" Lon:   X XX' XX.XXXXX" W│
└───────────────────────────────── Cooked TPV ─────────────────────────────────┘
┌──────────────────────────────────────────────────────────────────────────────┐
│ GPGSV GLGSV GNGLL GNRMC GNVTG GNGGA GNGSA                                    │
└───────────────────────────────── Sentences ──────────────────────────────────┘
┌──────────────────┐┌────────────────────────────┐┌────────────────────────────┐
│Ch PRN  Az El S/N ││Time:      205435.00        ││Time:      205435.00        │
│ 0   2  99 21   0 ││Latitude:    XXXX.XXXXX N   ││Latitude:  XXXX.XXXXX       │
│ 1   3 351  7  18 ││Longitude:  XXXXX.XXXXX W   ││Longitude: XXXXX.XXXXX      │
│ 2   6  54 21  31 ││Speed:     0.029            ││Altitude:  69.7             │
│ 3  12  73 67  24 ││Course:                     ││Quality:   1   Sats: 12     │
│ 4  19  37 13  13 ││Status:    A       FAA: A   ││HDOP:      0.87             │
│ 5  22 330  7  14 ││MagVar:                     ││Geoid:     49.1             │
│ 6  24 131 28  18 │└─────────── RMC ────────────┘└─────────── GGA ────────────┘
│ 7  25 251 70  27 │┌────────────────────────────┐┌────────────────────────────┐
│ 8  29 188 23  33 ││Mode: A3 ...s: 6 12 19 22 2 ││UTC:           RMS:         │
│ 9  31 297 22  30 ││DOP: H=0.87  V=1.31  P=1.57 ││MAJ:           MIN:         │
│10  32 263 46  25 ││TOFF:  0.120069230          ││ORI:           LAT:         │
│11  65 329 25   0 ││PPS: -0.000019782           ││LON:           ALT:         │
└────── GSV ───────┘└──────── GSA + PPS ─────────┘└─────────── GST ────────────┘
Great, your GPS is working! Note you should also be able to see that PPS is also working.
Step 5: Setting up NTP server
Before we get to far ahead of ourselves we need to disable NTP support in DHCP. Normally DHCP would deliver time server config to their clients allowing them to synchronise time properly. This is good except for NTP time servers themselves!
Edit /etc/dhcp/dhclient.conf and remove sntp-servers and ntp-servers. This is mine after removing those parts:
# Normally, if the DHCP server provides reasonable information and does
#       not leave anything out (like the domain name, for example), then
#       few changes must be made to this file, if any.
#

option rfc3442-classless-static-routes code 121 = array of unsigned integer 8;

send host-name = gethostname();
request subnet-mask, broadcast-address, time-offset, routers,
        domain-name, domain-name-servers, domain-search, host-name,
        dhcp6.name-servers, dhcp6.domain-search, dhcp6.fqdn,
        netbios-name-servers, netbios-scope, interface-mtu,
        rfc3442-classless-static-routes;
Delete the following files:
/etc/dhcp/dhclient-exit-hooks.d/ntp
/lib/dhcpcd/dhcpcd-hooks/50-ntp.conf
Build NTP from source
I’m not 100% sure that this is necessary, the default NTP may be fine, but the other instructions I found all built NTP from source, so I did the same - potentially the default NTP install will work just fine, but it may lack PPS support - hence building from source.
First lets install NTP the normal way to make sure we have all the dependencies and start up scripts in place:
sudo apt-get install ntpNow we will build it again…
Edit /etc/apt/souces.list and uncomment the line with deb-src:
deb-src http://raspbian.raspberrypi.org/raspbian/ buster main contrib non-free rpiThen we will make sure we have all the build dependencies for ntp:
sudo apt-get update
sudo apt-get -y build-dep ntp
Now lets download and unzip the latest ntp from http://ntp.org/downloads.html - at the time of writing this post it was 4.2.8p15:
wget http://www.eecis.udel.edu/~ntp/ntp_spool/ntp4/ntp-4.2/ntp-4.2.8p15.tar.gz
tar -xzf ntp-4.2.8p15.tar.gz ntp-4.2.8p15/
and jump into the new directory:
cd ntp-4.2.8p15/Run the following command to configure it (this can take a while):
./configure --prefix=/usrand then we run make, which will take even longer:
makeOnce that has run, we will stop the existing ntp service and install our new one:
sudo service ntp stop
sudo make install
Finally we want to stop apt-get from overwriting our install, so we can put a hold on it using the following command:
echo "ntp hold" | sudo dpkg --set-selectionsFinally we can start our new ntp service:
sudo service ntp startAdd GPS and PPS as sources for NTP
Finally we need to tell NTP that we have some better time sources to use.
Even though GPS provides highly accurate time, it’s a best practice to have multiple time sources and let ntpd sort it out: if the GPS antenna gets disloged or blocked or something, we want at least some semblance of accurate time rather than just freewheeling with no real time source.
Edit /etc/ntp.conf and you should see that there are a number of pools in there already - I have commented out all but the first two pools. Ideally I need to find some UK based stratum-1 servers to add here instead - network time lag is key here, I don’t want to be grabing time from half way around the world!
# pool.ntp.org maps to about 1000 low-stratum NTP servers.  Your server will
# pick a different set every time it starts up.  Please consider joining the
# pool: <http://www.pool.ntp.org/join.html>
pool 0.debian.pool.ntp.org iburst
pool 1.debian.pool.ntp.org iburst
# pool 2.debian.pool.ntp.org iburst
# pool 3.debian.pool.ntp.org iburst
At the end of this file we will add our GPS and PPS using pseudo addresses which refer to shared memory addresses - any other method of getting these timing is not fast enough. Microseconds count here, so we will read the time directly out of memory! I’m using Johannes Weber’s settings, which seem to work well. Add the following lines to the end of /etc/ntp.conf:
# pps-gpio /dev/pps0
server 127.127.22.0 minpoll 4 maxpoll 4
fudge 127.127.22.0 refid PPS

# gpsd clock via shm
server 127.127.28.0 minpoll 4 maxpoll 4 prefer
fudge 127.127.28.0 time1 +0.130 refid GPS flag1 1
Finally lets restart NTP and check if it all works:
sudo systemctl restart ntp
ntpq -p
When you first start it may take some time for the GPS to get a fix, but once it has and GPS and PPS data is coming in you should see something like this:
     remote           refid      st t when poll reach   delay   offset  jitter
==============================================================================
 0.debian.pool.n .POOL.          16 p    -   64    0    0.000   +0.000   0.001
 1.debian.pool.n .POOL.          16 p    -   64    0    0.000   +0.000   0.001
oPPS(0)          .PPS.            0 l    8   16  377    0.000   +0.037   0.003
*SHM(0)          .GPS.            0 l    7   16  377    0.000  +13.835   0.637
-time.rdg.uk.as4 67.92.135.130    3 u   27   64   77   31.574   -7.645   1.265
+ns1.do.steersne 157.44.176.4     2 u   27   64   77   31.283   -7.389   1.659
-x.ns.gin.ntt.ne 249.224.99.213   2 u   24   64   77   36.340   -8.447   1.979
-195.219.205.9   195.219.14.21    2 u   29   64   77   34.430   -6.360   1.983
+85.199.214.101  .GPS.            1 u   24   64   77   39.596  -10.702   3.007
-ferrars.curadig 131.188.3.223    2 u   21   64   77   35.906   -7.929   3.018
-ns4.turbodns.co 90.187.99.165    2 u   22   64   77   37.696   -8.412   3.140
Note the o symbol (= PPS peer when the prefer peer is valid) before the PPS, as well as the * symbol (= system peer) before the SHM; refer to Peer Status Word. These symbols must be present. Otherwise your instance is not working correctly, which would show an x instead.
The IP address below are the peers that NTPD has chosen from the two pools we left in the configuration, these will act as backup time sources if our GPS fails for some reason.
Congratulations, if you got this far you have a working NTP server that should be highly precise!